Adding Load Balancing to the nginx Setup

Sat Sep 20 11:00:45 EDT 2014

Tags: nginx
  1. Sep 18 2014 - Setting up nginx in Front of a Domino Server
  2. Sep 20 2014 - Adding Load Balancing to the nginx Setup
  3. Sep 22 2014 - Arbitrary Authentication with an nginx Reverse Proxy
  4. Sep 24 2014 - Domino and SSL: Come with Me If You Want to Live

In an earlier post, I went over the basic setup of installing nginx on a single Domino server to get the basic benefits (largely SSL). Next, it's time to expand the setup to have one nginx server in front of two Domino servers.

The concept is relatively straightforward: when an HTTP request comes in, nginx will pick one of the back-end servers it knows about and pass the request along to that. That allows for balancing the load between the two (since the act of processing the request is much more expensive than the proxying, you need far fewer proxies than app servers), as well as silent failover if a server goes down. The latter is very convenient from an administrative perspective: with this setup, you are free to bring down all but one Domino server at any time, say for maintenance or upgrades, without external users noticing.

The main complication in this phase is the handling of sessions. In the normal configuration, nginx's load balancing is non-sticky - that is to say, each request is handled on its own, and the default behavior is to pick a different server. In some cases - say, a REST API - this is just fine. However, XPages have server-side state data, so this would completely mess that up (unless you do something crazy). There is a basic way to deal with this built-in, but it's not ideal: it's "ip_hash", where nginx will send all requests from a given IP to the same back-end. That's more or less okay, but would run into problems if you have an inordinate number of requests from the same IP (or same-hashed sets of IPs). So to deal with this, I use another layer, a tool called "HAProxy". But first, there'll be a bit of a change to note in the Domino setup.

Domino

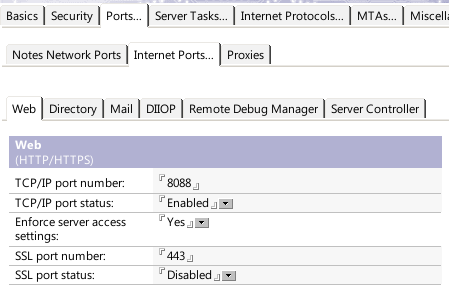
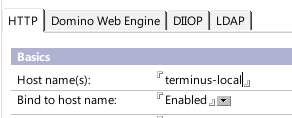
Since we'll now be balancing between two Domino servers, the main change is to set up a second one. It's also often a good idea to split up the proxy and app servers, so that you have three machines total: two Domino servers and one proxy server in front. If you do that, it's important to change the HTTP port binding from "localhost" to an address that is available on the local LAN. In my previous screenshot, I did just that. You can also change HTTP back to port 80 for conceptual ease.

In my setup, I have two Domino servers named Terminus and Trantor, available on the local network as terminus-local and trantor-local, with Domino serving HTTP on LAN-only addresses on port 80.

HAProxy

HAProxy is a very lightweight and speedy load balancer, purpose-built for this task. In fact, with the latest versions, you could probably use HAProxy alone instead of nginx, since it supports SSL, but you would lose the other benefits of nginx that will be useful down the line. So my setup involves installing HAProxy on the same server as nginx, effectively putting it in place of the Domino server in the previous post.

Much like nginx, installing HAProxy on Ubuntu/Debian is easy:

# apt-get install haproxy

The configuration is done in /etc/haproxy/haproxy.cfg. Most of the defaults in the first couple blocks are fine; the main thing to do will be to set up the last block. Here is the full configuration file:

global
        maxconn 4096
        user haproxy
        group haproxy
        daemon

defaults
        log     global
        mode    http
        option  httplog
        option  dontlognull
        retries 3
        option redispatch
        maxconn 2000
        contimeout      5000
        clitimeout      500000
        srvtimeout      500000

listen balancer 127.0.0.1:8088
        mode http
        balance roundrobin
        cookie balance-target insert
        option httpchk HEAD /names.nsf?login HTTP/1.0
        option forwardfor
        option httpclose
        server trantor trantor-local:80 cookie trantor check
        server terminus terminus-local:80 cookie terminus check

The listen block has HAProxy listening on the localhost address (so external users can't hit it directly) on port 8088 - the same settings as the local Domino server used to be, so the nginx config from before still applies.

The session-based balancing comes in with the balance, cookie, and server lines. What they do is tell HAProxy to use round-robin balancing (choosing each back-end in turn for a new request), to add a cookie named "balance-target" (could be anything) to denote which back-end to use for future requests, and to know about the two servers. The server lines give the back-ends names, point them to the host/post combinations on the local network, tell them to use cookie values of "trantor" and "terminus" (again, could be anything), and, presumably, to perform the HTTP check from above (I forget if that is indeed what "check" means, but it probably is).

The httpchk line is what HAProxy uses to determine whether the destination server is up - the idea is to pick something that each back-end server will respond to consistently and quickly. In Domino's case, doing a HEAD call on the login page is a safe bet (unless you disabled that method, I guess) - it should always be there and should be very quick to execute. When Domino crashes or is brought down for maintenance, HAProxy will notice based on this check and will silently redirect users to the next back-end target. Any current XPage sessions will be disrupted, but generally things will continue normally.


And that's actually basically it - by shimming in HAProxy instead of a local Domino server, you now have smooth load balancing and failover with an arbitrary number of back-end servers. The cookie-based sessions mean that your apps don't need any tweaking, and single-server authentication will continue to work (though it might be a good idea to use SSO for when one back-end server does go down).

There is actually a module for nginx that does cookie-based sticky sessions as well, but the stock Ubuntu distribution doesn't include it. If your distribution does include it - or you want to compile it in from source - you could forgo the HAProxy portion entirely, but in my experience there's no great pressure to do so. HAProxy is light enough and easy enough to configure that having the extra layer isn't a hassle or performance hit.

Generating JSON in XPages Applications

Thu Sep 18 17:55:44 EDT 2014

Tags: json java

This topic is fairly well-trodden ground, but there's no harm in trodding it some more: methods of producing JSON in the XPages environment. Specifically, this will be primarily about the IBM Commons JSON classes, found in com.ibm.commons.util.io.json. The reason for that choice is just that they ship with Domino - other tools (like Gson) are great too, and in some ways better.

Before I go further, I'd like to reiterate a point I made before:

Never, ever, ever generate code without proper escaping.

This goes for any executable, markup, or data language like this. It's tempting to generate XML or JSON in Domino views, but formula language lacks proper escape functions and so, unless you are prepared to study the specs for all edge cases (or escape every character), don't do it.

So anyway, back to the JSON generation. To my knowledge, there are three main ways to generate JSON via the Commons libraries: a single call to process an existing Java object, by building a JsonJavaObject directly, and by "streaming" the code bit by bit. I've found the first and last methods to be useful, but there's nothing inherently wrong about the middle one.

Processing an existing object

With this route, you use a class called JsonGenerator to process an existing JSON-compatible object (usually a List or Map) into a String after building the object via some other mechanism. In a simple example, it looks like this:

Map<String, Object> foo = new HashMap<String, Object>();
foo.put("bar", "baz");
foo.put("ness", 1);
return JsonGenerator.toJson(JsonJavaFactory.instance, foo);

Overall, it's fairly straightforward: create your Map the normal way (or get it from some library), and then pass it to the JsonGenerator. Becuase it's Java, it forces you to also pass in the type of generator you want to use, and that's JsonJavaFactory's role. There are several instance objects that seem to vary primarily in how much they rely on the other Commons JSON classes in their implementation, and I have no idea what the performance or other characteristics are like. instance is fine.

Building a JsonJavaObject

An alternate route is to use the JsonJavaObject directly and then toString it at the end. This is very similar in structure to the previous example (because JsonJavaObject inherits from HashMap<String, Object> directly, for some reason):

JsonJavaObject foo = new JsonJavaObject();
foo.put("bar", "baz");
foo.put("ness", 1);
return foo.toString();

The result is effectively the same. So why do I avoid this method? Mostly for flexibility reasons. Conceptually, I don't like assuming that the data is going to end up as a JSON string right from the start unless there's a compelling reason to do so, and so it's strange to use JsonJavaObject right out of the gate. If your data starts coming from another source that returns a Map, you'll need to adjust your code to account for it, whereas that is less the case in the first case.

Still, it's no big problem if you use this. Presumably, it will be slightly faster than the first method, and it's often functionally identical anyway (considering it is a Map<String, Object>).

Streaming

This one is the weird one, but it will be familiar if you've ever written a renderer (stay tuned to NotesIn9 for an example). Rather than constructing the entire object, you push out bits of the JSON code as you go. There are a couple reasons you might do this: when you want to keep memory/processor use low when dealing with large objects, when you want to make your algorithm recursive without, again, using up too much memory, or when you're actually streaming the result to the client. It's the ugliest method, but it's potentially the fastest and most efficient. This is what you want to use if you're writing out a very large collection (say, filtered view data) in an XAgent or other servlet.

I'll leave out an example of using it in a streaming context for now, but if you're curious you can find examples in the DAS code in the Extension Library or in the REST API code for the frostillic.us model objects (which is derived wholesale from DAS).

The key object here is JsonWriter, which is found in the com.ibm.commons.util.io.json.util sub-package. Much like with other Writers in Java, you hook this up to a further destination - in this example, I'll use a StringWriter, which is a basic way to write into a String in memory and return that. In other situations, this would likely be the ServletOutputStream. Here's an example of it in action:

StringWriter out = new StringWriter();
JsonWriter writer = new JsonWriter(out, false);

writer.startObject();

writer.startProperty("bar");
writer.outStringLiteral("baz");
writer.endProperty();

writer.startProperty("ness");
writer.outIntLiteral(1);
writer.endProperty();

Map<String, Object> foo = new HashMap<String, Object>();
foo.put("bar", "baz");
foo.put("ness", 1);
writer.startProperty("foo");
writer.outObject(foo);
writer.endProperty();

writer.endObject();

writer.flush();
return out.toString();

As you can tell, the LOC count ballooned fast. But you can also tell that it makes a kind of sense: you're doing the same thing, but "manually" starting and ending each element (there are also constructs for arrays, booleans, etc.). This is very similar to writing out HTML/XML using equivalent libraries. And it's good to know that there's always a fallback to output a full object in the style of the first example when it's appropriate. For example, you might be outputting data from a large view - many entries, but each entry is fairly simple. In that case, you'd use this writer to handle the array structure, but build a Map for each entry and add that to keep the code simpler and more obvious.


So none of these are right in all cases (and sometimes you'll just do toJson(...) in SSJS), but they're all good to know. Most of the time, the choice will be between the first and the last: the easy-to-use, just-do-what-I-mean one and the cumbersome, really-crank-out-performance one.

Setting up nginx in Front of a Domino Server

Thu Sep 18 13:08:46 EDT 2014

Tags: nginx ssl
  1. Sep 18 2014 - Setting up nginx in Front of a Domino Server
  2. Sep 20 2014 - Adding Load Balancing to the nginx Setup
  3. Sep 22 2014 - Arbitrary Authentication with an nginx Reverse Proxy
  4. Sep 24 2014 - Domino and SSL: Come with Me If You Want to Live

As I've mentioned before and now presented on, I'm a big proponent of using a reverse proxy in front of Domino. There are numerous benefits to be gained, particularly when you expand your infrastructure to include multiple back-end servers. But even in the case of a single server, I've found it very worthwhile to set up, and not overly complicated. This example uses nginx and Domino on Ubuntu Linux, but the ideas and some configuration apply much the same way on other OSes and with other web servers.

Domino

The first step involves a bit of configuation on the Domino server. The first is to move Domino off the main port 80, disable SSL, and, ideally, bind it to a local-only IP address. The port setting is familiar - I picked port 8088 here, but it doesn't matter too much what you pick as long as it doesn't conflict with anything else on your server:

The next step is to bind Domino to a local-only adapter so external clients don't access its HTTP stack directly. In this example, I have a LAN-only adapter whose IP address I named "terminus-local" in /etc/hosts, but I imagine "localhost" would work just fine in this case:

Once that's set, the last stage of configuration is to enable the WebSphere connector headers by setting a notes.ini property:

HTTPEnableConnectorHeaders=1

Enabling these will allow us to send specialized headers from our reverse proxy to Domino to make Domino act as if the request is coming to it directly.

After that, restart Domino (or just HTTP, probably).

nginx

Next, it's on to setting up nginx. On Ubuntu/Debian, it's pretty straightforward:

# apt-get install nginx

The main config file /etc/nginx/nginx.conf should be good as-is. The way the Ubuntu config works, you set up individual web site files inside the /etc/nginx/sites-available directory and then create symlinks to them in the /etc/nginx/sites-enabled directory. Out of convention, I name them like "000-somesite" to keep the priority clear. The first file to create is a site to listen on port 80, which will serve entirely as a redirect to SSL. You don't have to do this - instead, you could bring the content from the next file into this one instead of the redirection line. This is usually a good idea, though. This file is 001-http-redirect:

server {
	listen [::]:80;

	return https://$host$request_uri;
}

The only really oddball thing here is the "listen" line. Normally, that would just be "listen 80", but adding the brackets and colons allows it to work on IPv4 and IPv6 on all addresses.

The next file is the important one for doing the proxying, as well as SSL. It's 002-domino-ssl:

server {
        listen [::]:443;

        client_max_body_size 100m;

        ssl on;
        ssl_certificate /etc/nginx/ssl/ssl-unified-noanchor.pem;
        ssl_certificate_key /etc/nginx/ssl/ssl.key;

        location / {
                proxy_read_timeout 240;
                proxy_pass http://localhost:8088;
                proxy_redirect off;
                proxy_buffering off;

                proxy_set_header        Host               $host;
                proxy_set_header        X-Forwarded-For    $proxy_add_x_forwarded_for;
                proxy_set_header        $WSRA              $remote_addr;
                proxy_set_header        $WSRH              $remote_addr;
                proxy_set_header        $WSSN              $host;
                proxy_set_header        $WSIS              True;
        }
}

The client_max_body_size line is to allow uploads up to 100MB. One thing to be aware of when using proxies is that they can impose their own limits on request sizes just as Domino does, and nginx's default is relatively low.

nginx's keychain format is almost as simple as just pointing it to your certificate and private key, with one catch: to have intermediate signing certificates (like those from your SSL provider or registrar), you concatenate the certificates into a single file. This tutorial covers it (and this config) nicely.

The core of the reverse proxy comes in with that location / block. In a more-complicated setup, you might have several such blocks to point to different apps, app servers, or local directories, but in this case we're just passing everything directly through to Domino. The first four lines do just that, setting a couple options to account for very-long-loading pages, to point to Domino, and some other options.

The proxy_set_header lines are the payoff for the connector headers we set up in Domino. The first is to pass the correct host name on to Domino so it knows which web site document to use, the second is a fairly standard-outside-of-Domino header for reverse proxies, and then the rest are a set of the available WebSphere (hence "$WS") headers, specifying what Domino should see as the remote address, the remote host name (I don't have nginx configured to do reverse DNS lookups, so it's the same value), the host name again, and whether or not it should act as being over SSL.

Once that's set, create symlinks to these files in the sites-enabled directory from the sites-available directory and restart nginx:

# ln -s ../sites-enabled/001-http-redirect
# ln -s ../sites-enabled/002-domino-ssl
# service nginx restart

Assuming all went well, you should be all set! This gets you a basic one-server proxy setup. The main advantage is the superior SSL handling - nginx's SSL stack is OpenSSL and thus supports all the modern features you'd expect, including SHA-2 certificates and the ability to serve up multiple distinct SSL certificates from the same IP address (this would be done with additional config files using the server_name parameter after listen). Once you have this basis, it's easy to expand into additional features: multiple back-end servers for load balancing and failover, better error messages when Domino crashes (which is more frequent than nginx crashing), and nifty plugins like GeoIP and mod_pagespeed.

Edit 2015-09-16: In my original post, I left out mentioning what to do about those "sites-enabled" documents if you're not running on Ubuntu. There's nothing inherently special about those directories to nginx, so a differently-configured installation may not pick up on documents added there. To make them work in an installation that doesn't initially use this convention, you can add a line like this to the /etc/nginx/nginx.conf (or equivalent) file, at the end of the http code block:

http {
    # ... existing stuff here

    include /etc/nginx/sites-enabled/*;
}

Designer Experiment and Feature Request: JSF Tools in Designer

Wed Sep 17 18:31:59 EDT 2014

Tags: jsf fixit

TL;DR: You can install JSF tools in Designer to help out quite a bit with faces-config.xml editing, but there are bugs that may require changes in Designer's code to fix.

I was having a discussion about Andrew Magerman's recent on-point jeremiad about SSJS and the topic got to the difficulty of using Java in XPages if you don't already know the ropes - creating classes, managed beans, etc.. I looked around a bit for examples of how other tools do it, and I found this page on using the Web Tools Platform (WTP) plugins in Eclipse for doing basic JSF development. Looking through the tutorial, you can see parts that don't apply to XPages (the stuff about locating the tags and creating JSP elements), but some parts clearly would, such as the faces-config.xml editor. Mid-lamentation about how this isn't available to us, I noticed the date: June 18, 2007. "2007?" I said to myself. "Why, that's even older than Designer!"

So I set out trying to cram this stuff into Designer. The first step was to find a version of WTP that would work with the base version of Eclipse used in Designer - Ganymede, or Eclipse 3.4. I found an archived build of WTP version 3.0.5, which fits our needs. Unlike most Eclipse plugins, the download lacks a normal site.xml file, so I dropped the features and plugins into their respective folders in <Notes Data>\domino\workspace\applications\eclipse.

The next step was to install the prerequisites. To do that, I added the standard Ganymede Update Site to Designer in the File → Application → Install screen with the name "Ganymede" and URL "http://download.eclipse.org/releases/ganymede/". I found everything I could relating to the core EMF, EMF XSD, GEF, DTP, and their SDKs. Once I had them installed and I restarted, I went to File → Application → Application Management to find the category containing the WTP stuff, the "Java EE Developer Tools":

For me, it was disabled by default, so I had to click the "show disabled" icon (the third in the toolbar) and then select and enable it. If you're missing any dependencies, it'll tell you, though it'll give you the plugin ID instead of a friendly name. Fortunately, it's usually easy enough to match the friendly name to what you need from the Update Site. Everything is in there, in any event.

Once that stuff was enabled (and I restarted Designer), I still had the task of actually enabling the tools for an NSF project. Normally, you'd create a new Web Project in Eclipse and it would come pre-configured, but that's not how it works with NSFs. There's supposed to be a way to enable the features after the fact to an existing project ("Project Facets"), but I found that that didn't even show up until I took a couple steps first.

To find what I needed, I created a new Web project (New → Web → Dynamic Web Project) with the "JavaServer Faces v1.1 Project" configuration:

Then, I went to copy some of the project settings from that project into the NSF. To do that, I enabled displaying dotfiles in the Package Explorer (the "sandwich" icon → Filters... → uncheck ".* resources") and then opened ".project" inside the newly-created project. From there, I copied some lines from the natures node of the XML and pasted them into the same place in the ".project" file for the NSF:

		<nature>org.eclipse.wst.common.modulecore.ModuleCoreNature</nature>
		<nature>org.eclipse.wst.common.project.facet.core.nature</nature>

I also copied two files from the ".settings" folder of the new project to the one in the NSF:

org.eclipse.wst.common.component
org.eclipse.wst.common.project.facet.core.xml

Once I did that, I was able to right-click on the NSF project, go to Properties, and see "Project Facets". In there, I selected the "JavaServer Faces v1.2 Project" and then clicked the "Further configuration required..." link that sprouts at the bottom. I tweaked the settings slightly to match the NSF layout, namely the source folder:

Then I hit Next and... nothing happened. Or, more accurately, an NPE was thrown out to the OSGi console. That appears to happen sometimes and I'm not sure what triggers it, but some combination of re-opening Designer and re-copying those files seems to help. Who knows?

Once the Next button DID work, the next page was fine, so I hit okay. When I did that, Eclipse got to work JSF-ifying the project, creating stuff like web.xml and MANIFEST.MF files we don't need. Those aren't important (I wish web.xml was important), but they're not everything it enables: the cool thing that you get to use is the faces-config.xml editor. Since the DB I created used an older, pre-Framework-and-@ManagedBean version of my XPages Scaffolding project, it came chock full of values already filled in:

And it's not just viewing what's there. The editor comes with tools for letting you create each of these elements. In some cases, it's just a Java class picker (which on its own is valuable due to not having to remember the XML element name), but in others it's much more complex. Managed beans are a perfect example - the editor lets you create beans based on either an existing class or an inline new class (make sure you pick the right source folder), it recommends a name for you (for if you're lazy), and even lets you specify the different types of managed properties, the names of which it picks up from the getters and setters in the class (!):

This includes the esoteric list and map values:

So this is pretty cool, huh? Should everyone just drop it into Designer and lead better, more-productive XPage-developing lives? Well... not quite. Aside from the fact that we can't use all the other goodies from the tool set (like the JSP editor) and the parts that the tools don't know about (like view-scoped managed beans), there's a problem wherein part of the configuration needed to support the editor is reset whenever you close and re-open the NSF in Designer. I've been able to track down changes it makes to the .settings/.jsdtscope file, but just fixing that isn't enough to make it work again (or, if it is, it takes a project re-open to refresh, which defeats the point). The upshot is that you need to go through that project-facet setup every time you open the project. The editor also doesn't open up when you open faces-config.xml from the "Applications" view, only the "Package Explorer" view (well, presumably any non-"Applications" view would do).

This is where the feature request comes in: I think this sort of thing should be in Designer (better: the XPages/VFS bits of Designer should be in stock Eclipse, but that's a larger project). There's a lot standing in between us and using all of the available web tools, but even just the faces-config.xml editor would go miles toward making Java palatable to legacy-Notes developers, and would even be a nice quality-of-life improvement to those of us who breathe Java daily. The first step to improving XPages app development is to make it easier to do the right thing, and this would be a big step in that direction.

Quick Tip: A View-Filtering Search Box

Tue Sep 16 21:31:16 EDT 2014

Tags: xpages

One of the problems that crops up in some situations in XPages is the one described here: executing Ajax queries in too rapid a succession can cause the browser to cap them out until a full refresh. Depending on how you're encountering the problem, there may be a built-in solution: XSP controls that execute Ajax requests often have a throttling or latency parameter, and the same applies for "manual" JS widgets like Select2 (called "quietMillis" there).

Another such situation is the topic of this code snippet: a "filter view" control that allows the user to type and executes partial refreshes for each keypress or clearing of the field. To solve this, I found a block of code I wrote years ago, but should do the trick nicely. It uses setTimeout and clearTimeout to do this sort of delayed search and throttling. As I recall, it worked pretty well, though you'd want to increase the 500ms latency if the request usually takes longer, I suppose (or improve your page speed).

The code is from a Custom Control with styleClass, style, and refreshId properties and stores its value in viewScope.searchQuery.

<?xml version="1.0" encoding="UTF-8"?>
<xp:view xmlns:xp="http://www.ibm.com/xsp/core">
	<xp:div styleClass="lotusSearch #{compositeData.styleClass}" style="#{compositeData.style}" id="searchBox">
		<xp:inputText id="searchQuery" styleClass="lotusText" value="#{viewScope.searchQuery}" type="search">
			<xp:this.attrs><xp:attr name="placeholder" value="Search"/></xp:this.attrs>
			<xp:this.onkeypress><![CDATA[
				if(event.keyCode == 13) {
					if(window.__searchTimeout) { clearTimeout(window.__searchTimeout) }
					XSP.partialRefreshPost("#{javascript:getComponent(compositeData.refreshId).getClientId(facesContext)}", {})
					return false
				}
			]]></xp:this.onkeypress>
			<xp:eventHandler event="search" submit="false">
				<xp:this.script><![CDATA[
					// search is fired when the "X" in WebKit is clicked to clear the box
					if(window.__searchTimeout) { clearTimeout(window.__searchTimeout) }
					window.__searchTimeout = setTimeout(function() {
						XSP.partialRefreshPost("#{javascript:getComponent(compositeData.refreshId).getClientId(facesContext)}", {
							execMode: "partial",
							execId: "#{id:searchBox}"
						})
					}, 500)
				]]></xp:this.script>
			</xp:eventHandler>
			<xp:this.onkeyup><![CDATA[
				// Keypress doesn't fire for deletion
				if(event.keyCode != 13) {
					// Let's try some trickery to auto-search a bit after input
					if(window.__searchTimeout) { clearTimeout(window.__searchTimeout) }
					window.__searchTimeout = setTimeout(function() {
						XSP.partialRefreshPost("#{javascript:getComponent(compositeData.refreshId).getClientId(facesContext)}", {
							execMode: "partial",
							execId: "#{id:searchBox}"
						})
					}, 500)
				}
			]]></xp:this.onkeyup>
		</xp:inputText>
	</xp:div>
</xp:view>

The Basic Xots Tasklet in the Blog

Sat Sep 06 09:28:25 EDT 2014

Tags: blog xots

Continuing in my two-day spat of blog posts shamelessly containing "blog" in the title, I figured I'd mention how I'm using Xots for new-comment notifications.

If you're not familiar with it, Xots is a recent addition to the OpenNTF Domino API (added in the recently-released M5 RC1 build), intended to replace both agents and DOTS. There's still more work to be done on the scheduling portion, but Xots is perfectly capable of running manually-created tasks in a similar manner to Threads and Jobs as well as, to a slightly-lesser extent, responding to custom-named events.

The latter is the way I'm using it. I created a Tasklet class and told it to be triggered when something sends an event named "newBlogComment". The code therein is pretty simple: there's a handleEvent method that is fired when an event with that name is fired (by any app on the server, but it's just the one currently), and that code is pretty bog-standard Domino emailing code. The trigger happens in the Comment model class, and it's just a basic one-line affair.

Now, admittedly, in order to get the Xots task working, I had to write an agent to specifically name the class in the $Xots field of the icon note, but that is something that will be handled by a Designer plugin eventually - it's just the price of being an early adopter for now.

So is this a big, world-changing paradigm shift? Not in this instance, but it demonstrates that it's pretty straightforward to start writing multi-threaded and decoupled code using Xots, including custom events. Over time, it will expand to cover scheduled tasks and API-triggered database events ("document saved", etc.). It's pretty cool stuff.

How I'm Handling URLs for the Blog

Fri Sep 05 20:27:31 EDT 2014

Tags: blog

As I mentioned in the introductory post for the blog, I'm putting my investigation into RequestCustomizerFactory classes to work in the blog.

At its core, the point of what I'm doing is to allow me to write code like this:

<xp:link text="whatever" value="/post.xsp?id=somepostid">

...and have the generated link be something like:

<a href="/blog/posts/somepostid">whatever</a>

The core of this is the ability of a RequestCustomizerFactory to specify a UrlProcessor that is used by basically every URL-generation routine in XPages to map the XSP-side URLs to their final HTML version. You can find the code in the config.ConfigRequestCustomizerFactory class. What I do is make use of a List of Maps in my config document to represent a configurable list of known redirections (which correspond to Substitution rules in the Directory). The UI in the configuration page looks like this (kindly ignore the unsightly buttons):

Alias Configuration

The first two columns are regular expressions to match the server name (to ensure that the DB still works if copied to another server or accessed by a different set of web rules) and XSP-side URLs, while the last is a replaceAll replacement pattern, where $1 represents "group #1" from the regular expression - the text enclosed by the first set of parentheses.

Using this, I'm able to keep my XSP code agnostic as to what cleaner routing is available on the server - I don't have to hard-code assumptions about "/blog/posts/somepostid" anywhere in XSP or Java. Instead, that's handled entirely via the user-editable configuration document.

Now, ideally, you wouldn't even need the configuration document. Ideally, the code would look to the Directory to figure out which web site is active and if it has any Substitution or (maybe) Redirection rules that apply to the current database. That's on the docket for future improvement, but for now the current method strikes a reasonable balance of agnostic code with user-level configurability.

New Blog Structure

Fri Sep 05 17:37:26 EDT 2014

Tags: blog

So I finally got around to re-doing my blog app after letting the previous one wither on the vine for years. The main things this new template has over the previous one are:

  • A properly responsive design care of WrapBootstrap. Conveniently, it's the same design I use for our internal task-tracking app, so I had most of the renderers ready.
  • Along those lines, the XSP structure is heavily based on standard/ExtLib components when at all possible, rather than putting the Bootstrap structure into the page code.
  • I've also switched it to being based on the frostillic.us Framework, which I'd darn well better, since it's the name of the blog.
  • I've finally separated the app and data NSFs, which I should have done a long time ago.
  • I'm trying out a RequestCustomizerFactory combined with some web rules to generate somewhat-better URLs while still writing the normal ".xsp" page names and query strings in the XSP code itself, so it remains portable. I'll have to go into how I'm doing that eventually... and I'll also have to expand how it works to cover RT data as well.
  • I put an actual license statement at the bottom of the page (again: finally).
  • Translation support for the app UI if I bother to add that.

One thing it doesn't have is any amount of professionalism in the development and deployment: it's the work of part of the last couple days and accordingly lacks a lot of even basic features (tags, threads, a proper search UI, etc.) and is probably buggy as sin. Still, I wanted to get something shipped instead of letting it linger forever. I've got a reasonably-lengthy TODO list in mind. As expected, it's been a good exercise in finding out what I still need to do both in the Framework and in my renderer.

For those curious, the code is up on GitHub:

https://github.com/jesse-gallagher/frostillic.us-Blog

(Not) My Slide Decks From MWLUG

Tue Sep 02 20:42:23 EDT 2014

Tags: mwlug

At this year's MWLUG, I presented two sessions: one on using nginx as a reverse proxy and load balancer, and one on structured XPages development.

Normally, the next step would be to post the slides, but my decks aren't particularly useful on their own - they were small 8-slide affairs that mostly served as a memory assistance to me, one sight gag, and then a "Demo" slide where I switched to the normal screen for the actual code.

So my plan instead is to blog with the details. The latter session's blog posts actually mostly exist already; I just need to finish the series and provide a capping-off. The nginx stuff, though, doesn't exist yet, and I hope to post my configs and an explanation of the basic process soon enough.

A Centralized Bean for Translation

Mon Sep 01 16:54:59 EDT 2014

Tags: java

The normal method for doing translation in XPages is by using the built-in Designer tooling, which creates properties files for each language for each XPage in your app. This is okay, though it requires using Designer to update the properties (since apparently the translation happens as part of the build process). For the refresh of my blog I'm working on, I'm taking a different tack, inspired by the way a client does it and similar to how I do it in the Framework.

Specifically, I have a centralized bean named "translation" that accepts strings and returns a best-match translation for the current session's locale. This "best match" is the routine that the XSP framework uses for getting resource bundles. So, taking my browser as an example, requesting the bundle named "translation" will cause it to search the classpath for these files until it finds one:

  1. translation_en_US.properties
  2. translation_en.properties
  3. translation.properties
  4. translation_fr.properties

(I'm not sure why it uses translation.properties before translation_fr.properties - maybe it assumes that it's the English strings when there's no locale code on the file).

So I take advantage of this by creating a DataObject bean to do my translation:

package config;

import java.io.IOException;
import java.io.Serializable;
import java.util.HashMap;
import java.util.Map;
import java.util.MissingResourceException;
import java.util.ResourceBundle;

import javax.faces.context.FacesContext;

import com.ibm.xsp.application.ApplicationEx;
import com.ibm.xsp.designer.context.XSPContext;
import com.ibm.xsp.model.DataObject;

import frostillicus.xsp.bean.SessionScoped;
import frostillicus.xsp.bean.ManagedBean;
import frostillicus.xsp.util.FrameworkUtils;

@ManagedBean(name="translation")
@SessionScoped
public class Translation implements Serializable, DataObject {
	private static final long serialVersionUID = 1L;

	public static Translation get() {
		Translation existing = (Translation)FrameworkUtils.resolveVariable(Translation.class.getAnnotation(ManagedBean.class).name());
		return existing == null ? new Translation() : existing;
	}

	private transient ResourceBundle bundle_;
	private Map<Object, String> cache_ = new HashMap<Object, String>();

	public Class<String> getType(final Object key) {
		return String.class;
	}

	public String getValue(final Object key) {
		if(!cache_.containsKey(key)) {
			try {
				ResourceBundle bundle = getTranslationBundle();
				cache_.put(key, bundle.getString(String.valueOf(key)));
			} catch(IOException ioe) {
				throw new RuntimeException(ioe);
			} catch(MissingResourceException mre) {
				cache_.put(key, "[Untranslated " + key + "]");
			}
		}
		return cache_.get(key);
	}

	public boolean isReadOnly(final Object key) {
		return true;
	}

	public void setValue(final Object key, final Object value) {
		throw new UnsupportedOperationException();
	}


	private ResourceBundle getTranslationBundle() throws IOException {
		if(bundle_ == null) {
			FacesContext facesContext = FacesContext.getCurrentInstance();
			ApplicationEx app = (ApplicationEx)facesContext.getApplication();
			bundle_ = app.getResourceBundle("translation", XSPContext.getXSPContext(facesContext).getLocale());
		}
		return bundle_;
	}
}

This uses the Framework's annotation-based managed-bean declaration, but it'd work just fine in faces-config. This allows you to use EL to request a translation, such as #{translation.home}, #{translation['home']}, or #{translation[someVar.prop]}, or by using translation.getValue(...) in Java or JavaScript.

I've found this approach to be much easier to work with. There's only one central file to manage (you could split it up into multiple beans), you don't have to re-generate files for new languages, and the keys can be natural and human-friendly, instead of XPaths.

In addition, you could easily change this bean to get its translation information elsewhere without modifying the XPages that use it - it could look up, for example, against Domino documents to allow non-developers to change the translation values without any special rights (though you'd likely want to tweak the cache in that case).